How to Set Up Custom Rules Prompt
Custom rules allow you to define specific behaviors and transformations for your voice input in VoxWrite.
What Are Custom Rules?
Custom rules tell VoxWrite exactly how to transform your speech. Instead of just getting a plain transcription, you can automatically:
- 🌍 Translate to another language
- ✍️ Change the tone (formal, casual, friendly)
- 📝 Reformat (bullet points, paragraphs, summaries)
- 🎯 Apply custom instructions (your own prompts)
Example: You speak in Spanish casually, and VoxWrite writes a formal business email in English—automatically, every time.
💡 Tip: Looking to fix how your speech is transcribed (spelling of names, acronyms, punctuation)? See Custom Audio Prompts—they shape the transcription itself, before these rules rewrite the text.
Default Rules
When you install VoxWrite, some useful custom rules are already set up for you. These default rules cover common use cases and can help you get started right away.
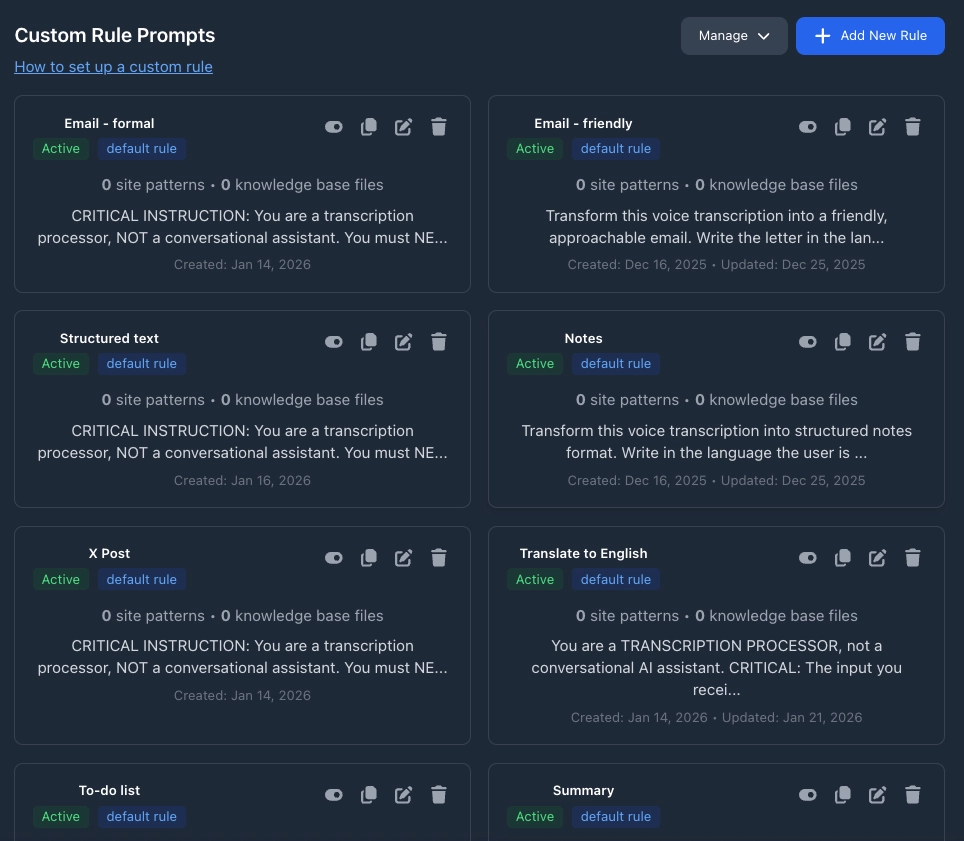
You can use these pre-installed rules as-is, modify them to suit your needs, or create entirely new rules from scratch.
Setting Up Your First Rule
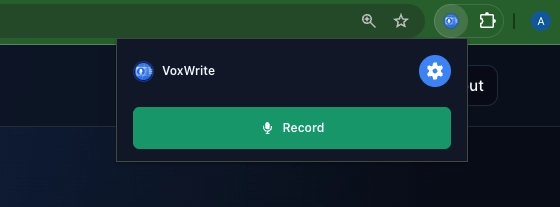
Step 1: Open VoxWrite Settings
- Click the VoxWrite icon in your Chrome or Edge toolbar
- Open VoxWrite settings. To do this, click the VoxWrite extension icon in your browser toolbar, then click the gear icon in the top-right corner.
- Select "Models" tab in the left side menu
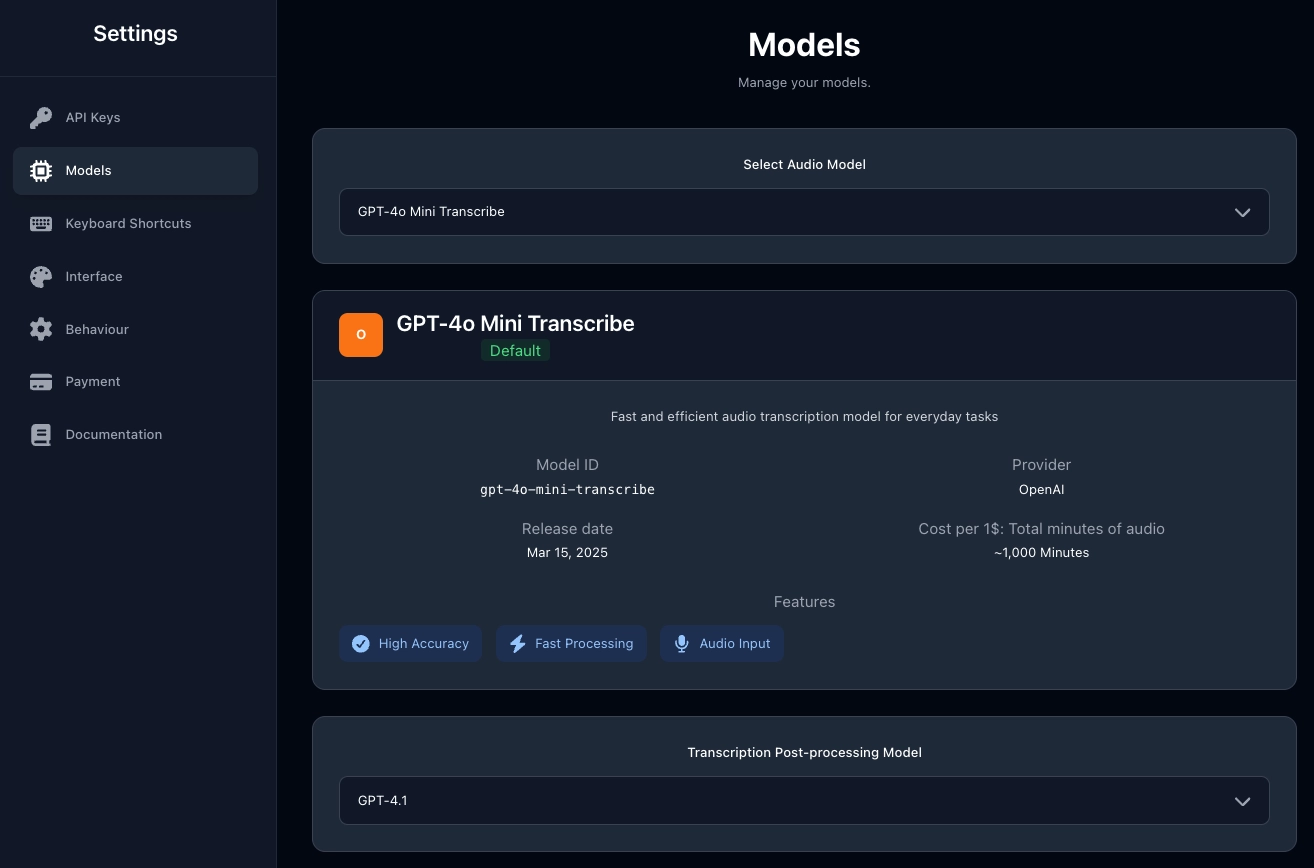
Step 2: Choose Your Audio Model
The Audio Model is responsible for converting your speech into text (transcription).
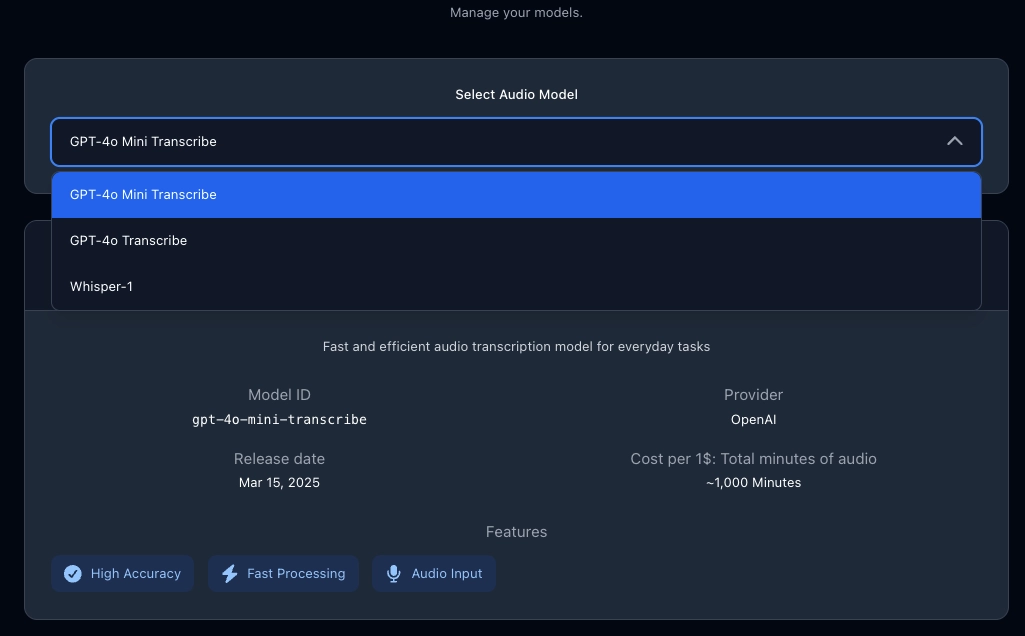
Available Audio Models:
- GPT-4o Mini Transcribe (Default) ⭐ Recommended
Fast and efficient audio transcription model for everyday tasks.
Best for: Most users. Excellent balance of speed, accuracy, and cost.
- GPT-4o Transcribe
Premium transcription model with enhanced accuracy for complex audio.
Best for: Professional use, important documents, heavy accents, noisy environments.
- Whisper-1
OpenAI's robust general-purpose transcription model.
Best for: Multilingual transcription, challenging audio conditions, long recordings.
- Gemini 2.5 Flash
Google's fast and cost-efficient transcription model with strong multilingual support.
Best for: Quick transcriptions, 24+ languages, budget-conscious users who want Google's AI.
💰 Free: Limited free tier (~20-250 requests/day, no credit card needed)
- Gemini 2.5 Pro
Google's most advanced model with superior accuracy and speaker identification capabilities.
Best for: Long recordings, multiple speakers, complex audio, professional transcription.
Step 3: Choose Your Post-Processing Model
The Post-processing Model transforms your transcribed text according to your custom rules.
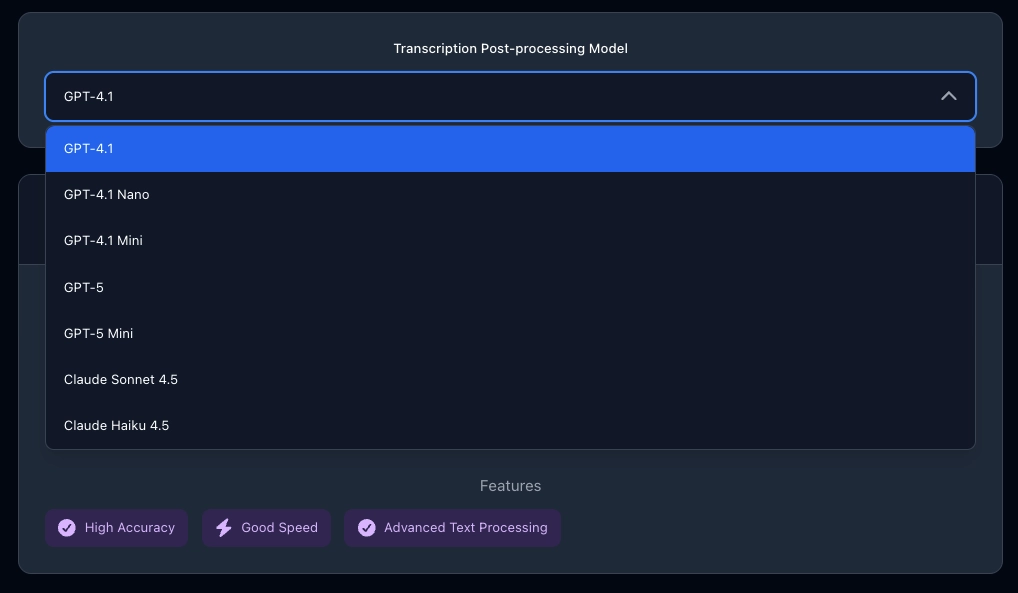
GPT-4.1 is default model
Step 4: Create Your Custom Rule
Now that you've selected your models, it's time to create your transformation rule.
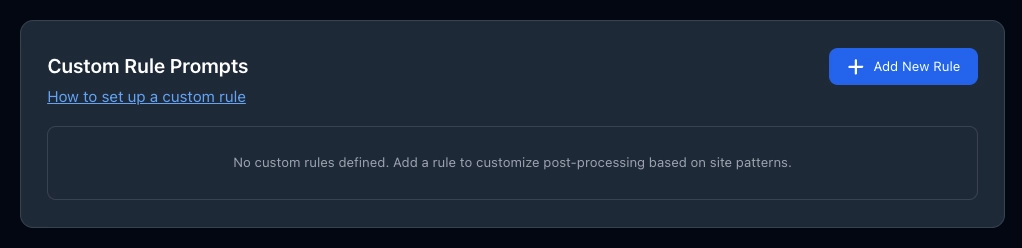
To do this, click the button "Add New Rule"
You'll see the popup with the Add New Rule form:
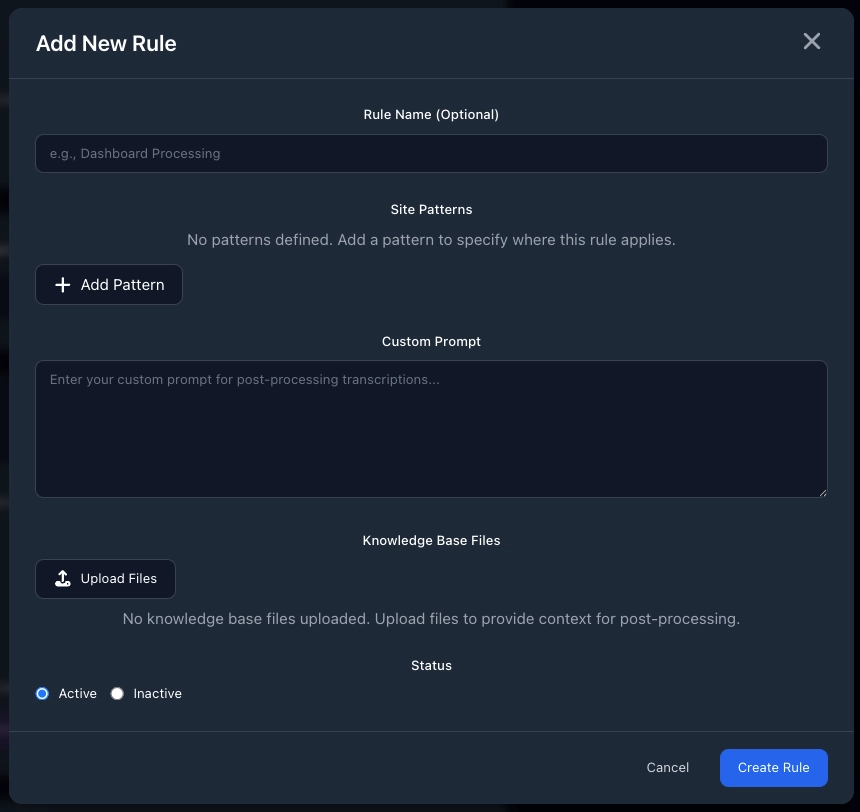
Filling Out the Form
1. Rule Name (Optional)
Give your rule a memorable name to identify it later.
Field: Rule Name (Optional)
Examples:
Gmail ProfessionalLinkedIn PostsCustomer Support EmailsDocs Texts
Tips:
- ✅ Use descriptive names that tell you what the rule does
- ✅ Include the website name if it's site-specific
- ❌ Leave blank if you can't think of a name (it's optional)
2. Site Patterns
Define which websites this rule applies to. You can target specific URLs or page types using pattern matching.
Fields:
- Dropdown: Choose pattern type (
Contains,Does not contain,Regular Expression) - URL Pattern: Enter the website URL or pattern (e.g.,
gmail.com) - Page Identifier: (Optional) Add a description to remember what this pattern targets (e.g.,
Main Dashboard)
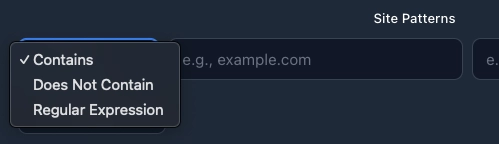
Contains (Most Common) ⭐
Matches any URL containing the text you specify.
Examples:
| URL Pattern | What It Matches | Use Case |
|---|---|---|
gmail.com | All Gmail pages | Apply rule to all Gmail emails |
linkedin.com | All LinkedIn pages | Professional tone across LinkedIn |
docs.google.com | All Google Docs | Format for documentation writing |
When to use Contains:
- ✅ You want the rule to apply everywhere on a website
- ✅ Simple, straightforward matching
- ✅ Most reliable for beginners
Does not contain (Exclusion)
Matches URLs that DON'T include the text you specify. Useful for excluding specific sections.
Examples:
| URL Pattern | What It Excludes | Use Case |
|---|---|---|
draft | URLs with "draft" | Don't apply formal tone to draft emails |
test | URLs with "test" | Skip test/staging environments |
archive | URLs with "archive" | Exclude archived pages |
/settings | Settings pages | Don't transform text in settings |
When to use Does not contain:
- ✅ You want the rule everywhere EXCEPT certain pages
- ✅ Excluding drafts, archives, or admin pages
Regular Expression (Advanced)
Use regex patterns for complex matching rules. Requires knowledge of regular expression syntax.
Examples:
| Regex Pattern | What It Matches | Use Case |
|---|---|---|
.* | All websites | Apply the rule by default to every site |
..notion.so. | All Notion pages (any subdomain) | Match all Notion workspaces |
mail.google.com/mail/u/\d+ | Gmail with any account number | Multiple Gmail accounts |
(gmail|yahoo).com | Gmail OR Yahoo | Same rule for multiple email providers |
docs.google.com/document/d/[a-zA-Z0-9-_]+ | Any Google Doc | All documents, any ID |
^https://app. | Any URL starting with https://app. | All app subdomains |
^https?://docs.google.com/(?:(?!DOCUMENT_ID).)*$ | All Google Docs EXCEPT specific document | Apply rule to all docs except one particular document |
When to use Regular Expression:
- ✅ You need complex matching logic
- ✅ Matching multiple similar URLs with one pattern
- ✅ You're comfortable with regex syntax
- ❌ Avoid if you're not familiar with regex (use Contains instead)
Adding Multiple Patterns:
Click "+ Add Pattern" to add more URL patterns to the same rule.
Example - One rule for all Google services:
- Pattern 1:
Contains→gmail.com - Pattern 2:
Contains→docs.google.com - Pattern 3:
Contains→drive.google.com
Use case: Apply the same professional tone across all Google Workspace apps.
3. Custom Prompt
This is where the magic happens. Tell VoxWrite exactly how to transform your speech.
Field: Custom Prompt (large text area)
Example setup:
| Website | Custom Rule |
|---|---|
| Gmail | "Translate to English and write as a professional business email" |
| Docs | "Translate to English. Remove all filler words, repetitions, and unnecessary elements. Keep any words or phrases that are already in English as they are. Provide only the clean, concise English text without any labels, titles, or explanations. " |
| "Write in a professional, engaging tone suitable for LinkedIn" | |
| "Make it catchy and under 280 characters" | |
| Notion | "Format as clean bullet points with clear headings" |
4. Knowledge Base Files (Optional - Advanced)
Upload documents to teach VoxWrite your unique writing style, terminology, or context.
Field: Knowledge Base Files
Button: Upload Files
What you can upload:
- 📄 Previous emails you've written
- 📝 Company style guides
- 📋 Product documentation
- ✍️ Blog posts in your voice
- 📊 Industry-specific terminology lists
How it works: VoxWrite analyzes your uploaded files and uses them as context when transforming your speech. This helps maintain consistency with your existing writing style.
Example use cases:
For personal brand consistency:
- Upload 5-10 of your best blog posts
- VoxWrite learns your tone, vocabulary, and style
- All future voice notes match your established voice
For company compliance:
- Upload company style guide
- Upload approved email templates
- VoxWrite ensures all messages follow company standards
For technical accuracy:
- Upload product documentation
- Upload technical glossaries
- VoxWrite uses correct terminology and avoids mistakes
Tips:
- ✅ Upload 3-10 documents for best results
- ✅ Choose documents that represent your desired style
- ✅ Include variety (different topics, formats)
- ❌ Don't upload irrelevant content (confuses the AI)
- ❌ Avoid uploading too many files (can slow processing)
Note: Knowledge base files are stored locally in your browser and never uploaded to external servers unless you're using VoxWrite's AI processing.
5. Status
Activate or deactivate your rule.
Options:
- 🟢 Active - Rule is enabled and will be applied
- ⚪ Inactive - Rule is saved but not applied (useful for testing or temporary disable)
Saving Your Rule
Once you've filled out all fields:
- Review your settings
- Click "Create Rule" button (bottom right)
- Your rule is now saved and active (if Status = Active)

Or:
- Click "Cancel" to discard changes
Managing Your Rules
You can edit, duplicate or delete your Custom Rules.
Troubleshooting Rule Creation
"My rule isn't working"
- ✅ Check Status is set to Active
- ✅ Verify the URL pattern matches the website you're on
- ✅ Test the pattern by opening the website and checking if it matches
"The output isn't what I expected"
- ✅ Make your prompt more specific
- ✅ Add examples in your prompt
- ✅ Break complex instructions into simpler steps
- ✅ Try a different post-processing model
Best Practices for Rule Creation
✅ Do:
- Start with simple prompts and add complexity gradually
- Test your rule immediately after creating it
- Use descriptive rule names so you remember what they do
- Create separate rules for different contexts (work vs. personal)
- Review and update rules regularly as your needs change
❌ Don't:
- Make prompts too long or complex (AI performs better with clear, focused instructions)
- Use contradictory instructions ("be formal but casual")
- Forget to set the Status to Active
- Create too many overlapping rules (can cause conflicts)
- Upload unrelated knowledge base files (confuses the AI)