Setting Up the Bubble (Floating Button)
The bubble (also called floating button) is a convenient way to access VoxWrite's recording from anywhere on a webpage.
What is the Bubble?
The bubble is a floating button that appears on your screen and follows you as you scroll. It provides quick access to VoxWrite's voice recording features.
Key features:
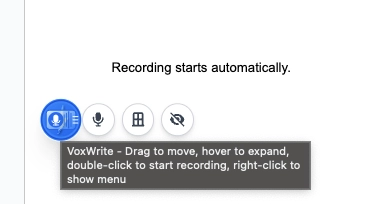
- 🎯 Always accessible - Appears on any webpage where you've configured it
- 🖱️ Drag to move - Position it anywhere on your screen
- 👆 Quick actions - Double-click to start recording, hover for menu
- 📍 Stays in place - Remembers your preferred position
How to use the bubble:
- Drag - Click and drag to move it anywhere
- Hover - Hover to see expanded controls
- Double-click - Start recording immediately (if Auto-Start is enabled)
Repositioning the Recording Overlay
The recording overlay can be moved. You can reposition it anywhere on the screen that's convenient for you.
To reposition the overlay:
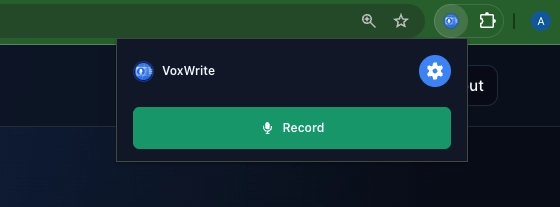
- Hover on the bubble with your mouse
- Click the "Position Overlay" button from the dropdown menu
- Drag and drop the window to any location on your screen
The overlay will remember your chosen position and open in that location going forward.
Step 1: Configure Behavior Settings
Before setting up your bubble, configure how it behaves when you interact with it.
Opening Behavior Settings
- Click the VoxWrite icon in your Chrome toolbar
- Go to Settings. To do this, click the VoxWrite extension icon in your browser toolbar, then click the gear icon in the top-right corner.
- Navigate to the "Behaviour" tab
Available Behavior Options
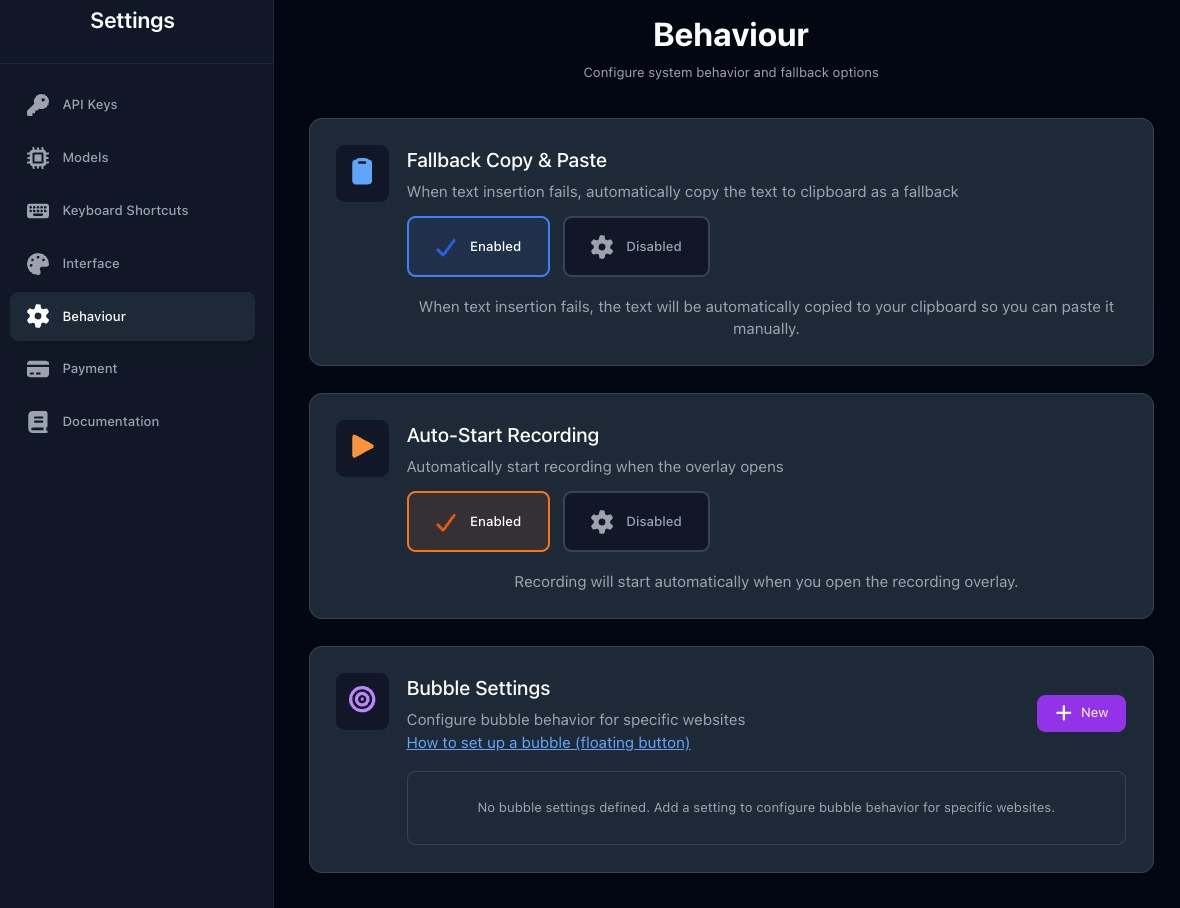
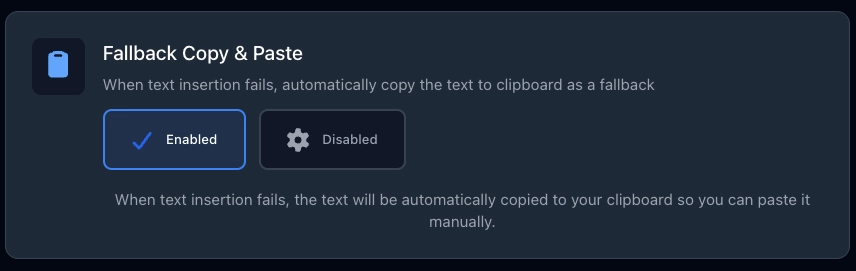
Fallback Copy & Paste
When text insertion fails, automatically copy the text to clipboard as a fallback.
Options:
- ✅ Enabled - Text automatically copied to clipboard if insertion fails
- ⚙️ Disabled - No automatic copying
When to enable:
- ✅ Some websites block automatic text insertion
- ✅ You want a backup method to get your text
- ✅ You prefer manual control over where text goes
How it works:
- VoxWrite tries to insert text directly into the field
- If that fails (website blocks it), text is copied to clipboard
- You can manually paste it wherever you need
Auto-Start Recording ⭐
Automatically start recording when the overlay opens.

Options:
- ✅ Enabled - Recording starts immediately when you open the overlay
- ⚙️ Disabled - You must manually click the record button
When enabled:
- Double-click the bubble → Recording starts immediately
- Click any microphone icon → Recording starts automatically
- No need to click "Start Recording" button
When to enable:
- ✅ You want the fastest possible workflow
- ✅ You're ready to speak as soon as you click
- ✅ You use VoxWrite frequently throughout the day
When to disable:
- ❌ You need time to prepare before speaking
- ❌ You want to review settings before recording
- ❌ You're in a noisy environment and need to time your recording
Note: Recording will start automatically when you open the recording overlay.

Step 2: Set Up Bubble for Specific Websites
Now configure where and how the bubble appears.
Opening Bubble Settings
In the Behaviour tab, scroll down to "Bubble Settings" section.
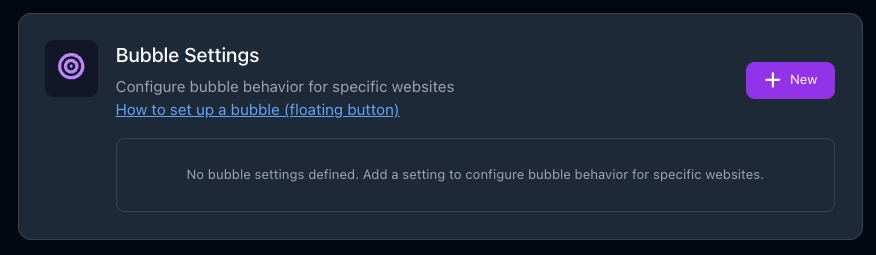
Add a setting to configure bubble behavior for specific websites.
Adding a New Bubble Setting
Click the "+ New" button to create a bubble configuration.
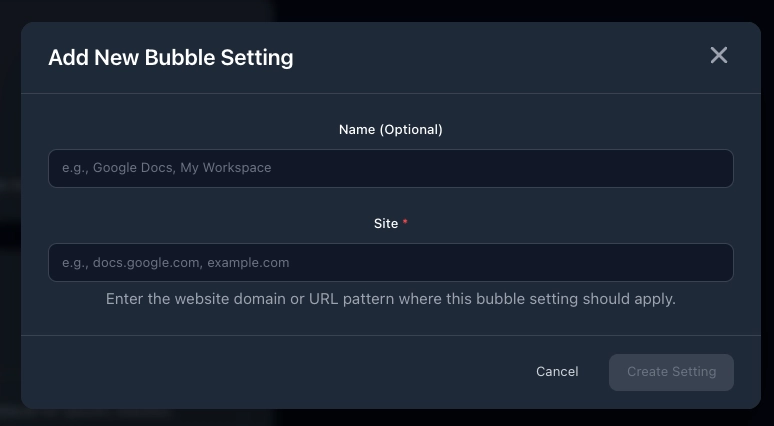
Fill Out the Form:
1. Name (Optional)
Give your bubble setting a memorable name.
Field: Name (Optional)
Examples:
Google DocsMy WorkspaceGmail BubbleSocial Media Sites
Tips:
- ✅ Use website name for easy identification
- ✅ Be descriptive if covering multiple sites
- ❌ Can leave blank - VoxWrite will use the site URL as the name
2. Site (Required)
Enter the website domain or URL pattern where this bubble should appear.
Field: Site * (required)
Placeholder: e.g., docs.google.com, example.com
Examples:
| Website | What to Enter | Result |
|---|---|---|
| Google Docs | docs.google.com | Bubble appears on all Google Docs pages |
| Gmail | mail.google.com | Bubble appears in Gmail |
| All Notion pages | notion.so | Bubble appears on any Notion workspace |
linkedin.com | Bubble appears across LinkedIn | |
| Specific subdomain | app.example.com | Bubble only on that specific subdomain |
Pattern matching:
- Enter just the domain (e.g.,
gmail.com) - Don't include
https://orwww. - Use specific URLs for precise targeting
- One domain per bubble setting
3. Save Your Setting
Click "Create Setting" button (bottom right) to save.
Or:
- Click "Cancel" to discard
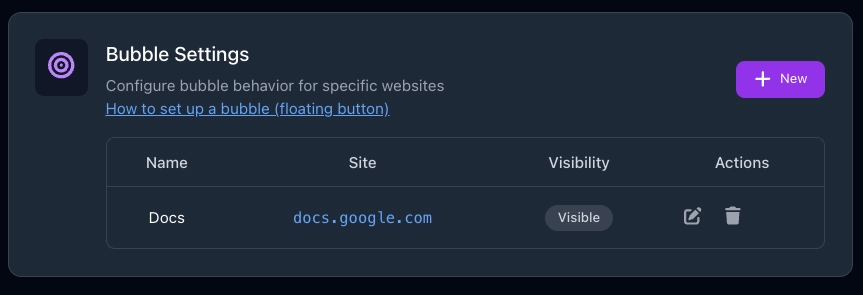
Example: Setting Up Bubble for Google Docs
Let's create a bubble that appears on Google Docs:
- Click "+ New" in Bubble Settings
- Name:
Docs - Site:
docs.google.com - Click "Create Setting"
Result: The bubble will now appear whenever you open a Google Doc.
Step 3: Managing Your Bubble Settings
After creating bubble settings, you'll see them listed in a table.
Editing a Bubble Setting
To modify an existing bubble configuration:
- Find the bubble setting in the list
- Click the Edit icon (pencil) in the Actions column
- Modify the Name or Site fields
- Click "Save Changes"
Deleting a Bubble Setting
To remove a bubble configuration:
- Find the bubble setting in the list
- Click twice the Delete icon (trash) in the Actions column
Warning: This action cannot be undone. The bubble will immediately stop appearing on that website.
Toggling Visibility
You can temporarily hide/show bubbles without deleting them:
- Find the bubble in the list
- Look at the Visibility column
- Click the status badge to toggle between:
- Visible - Bubble is active and appears on the website
- Hidden - Bubble is disabled but setting is saved
When to use Hidden:
- Temporarily disable bubble without losing configuration
- Test how a website works without the bubble
- Switch between different bubble configurations
Free Plan Limitation
Important: If you have a Free pricing plan, you can configure only one bubble setting.
What this means:
- ✅ You can create one bubble for one website
- ❌ Cannot add multiple bubble settings
- ✅ You can edit or change which website it's on
- ✅ You can delete and create a new one
To configure bubble for multiple websites:
- Upgrade to a paid plan
- Or manually switch your one bubble setting between different websites as needed
Upgrade benefits:
- Unlimited bubble settings
- Configure different bubbles for different websites
- Each website can have customized bubble behavior